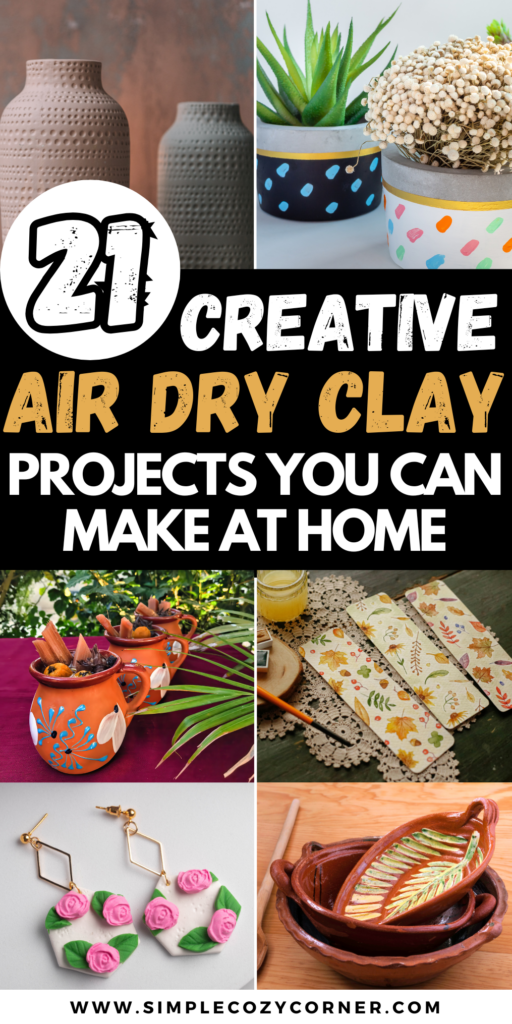
21+ Easy Air Dry Clay Projects You Can Make at Home
Please note, this post may contain Amazon affiliate links. If you make a purchase through these links, I may earn a commission at no additional cost to you. All opinions expressed here are entirely my own, based on my personal experience and research.
This Article Is All About Air Dry Clay Projects.
Working with air dry clay is a super fun and budget-friendly way to get creative at home.
Whether you’re crafting something decorative or functional, this material is easy to shape, dries on its own, and doesn’t require any fancy tools.
From handmade jewelry to personalized decor, these projects are perfect for all skill levels.
Let’s get into some inspiring ideas you can start making today.
Why Air Dry Clay Projects Are So Popular
Air dry clay has become a go-to for beginner and experienced crafters alike.
It’s accessible, easy to work with, and doesn’t require any special equipment like a kiln or oven.
You can create everything from cute gifts to everyday decor using just your hands and simple tools.
Best of all, the possibilities are nearly endless—and totally customizable.
Trinket Dishes
Trinket dishes are great for holding rings, keys, or loose change.
Use a small bowl as a mold or shape them freehand for a more organic look.
Press in patterns using lace, stamps, or leaves before the clay dries.
Once dry, paint them with pastels or metallics and seal with a clear finish.
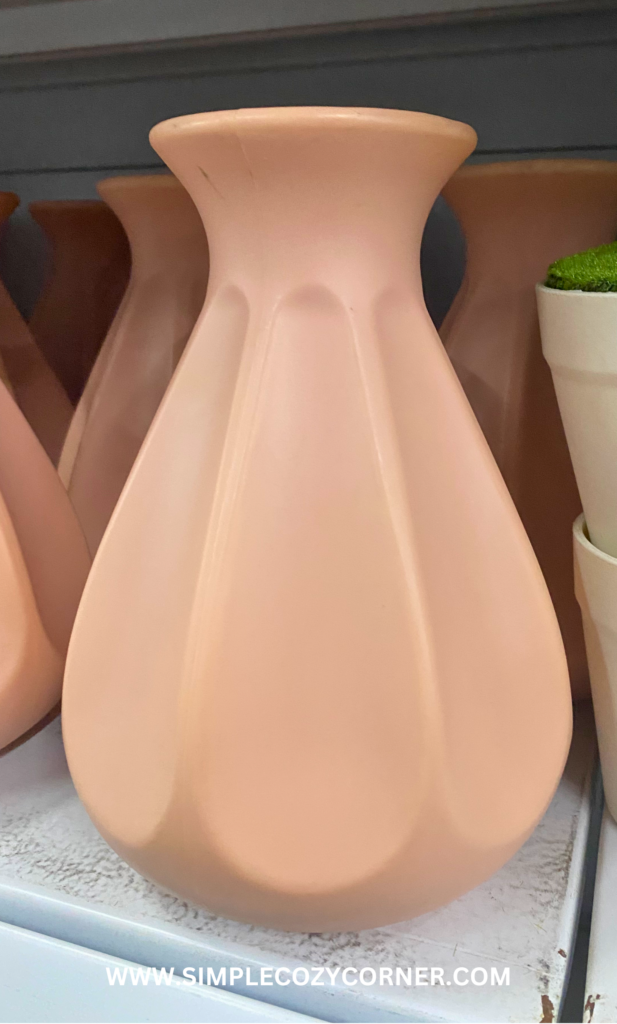
Minimalist Vases
Shape small vases to hold dried flowers or faux stems.
Roll out a slab, wrap it into a cylinder, and smooth the seam with damp fingers.
Texturize with a comb or scoring tool for added detail.
Let it dry completely before painting or sealing.
Leaf-Imprint Bowls
Press real leaves into clay circles to create textured bowls.
Mold the clay inside a round bowl and let it dry in place.
Once cured, paint the leaf impressions with earthy tones or metallic accents.
They make lovely decor or thoughtful handmade gifts.
Jewelry Pendants
Cut out pendants in shapes like moons, arches, or circles.
Use a toothpick to create holes for threading.
Let them dry fully before sanding the edges smooth.
Paint with abstract designs or speckled finishes for a trendy look.
Personalized Name Tags
Roll out clay and cut into rectangles or circles.
Use alphabet stamps or a skewer to carve names or initials.
Punch a hole at the top to string them onto gifts, keychains, or even pet collars.
These tags are super cute and add a handmade touch.
Decorative Wall Hangings
Create wall art with layered shapes like rainbows, arches, or suns.
Use string to connect each piece and hang from a wooden dowel.
Paint in cohesive color palettes or leave natural for a minimal vibe.
This one’s perfect for boho-inspired spaces.
Clay Coasters
Roll out clay and cut into circles, hexagons, or abstract shapes.
Add textures or patterns with stamps or fabric.
Let dry completely, then paint and seal for water resistance.
Great for everyday use or gifting with a set of mugs.
Miniature Planters
Shape small pots or cups to hold succulents or air plants.
Smooth the surface and let them dry fully before decorating.
Paint with color-blocked designs or tiny faces for extra personality.
They’re perfect for adding greenery to your desk or shelves.
Candle Holders
Form a simple base and carve out a space for tealights or taper candles.
Try sculpting geometric shapes for a modern twist.
Add a touch of gold paint or leave raw for a natural look.
Just be sure not to use them with open flames—LED candles are best.
Abstract Magnets
Cut small abstract shapes and glue a magnet on the back after they dry.
Use leftover clay scraps to create these little pieces.
Paint in bold, bright colors to liven up your fridge or workspace.
They’re tiny but make a big visual impact.
Air Plant Holders
Sculpt small, rounded holders with shallow indentations for air plants.
Decorate with dots, stripes, or earthy glazes.
They’re compact and make perfect accents for shelves or windowsills.
No drainage needed, so it’s super low-maintenance.
Clay Beads
Roll small balls or shape oblong forms to make beads.
Use a toothpick to create holes and let them dry.
String them onto cords for bracelets, necklaces, or garlands.
Mix colors and textures for a playful result.
Decorative Tiles
Flatten squares or rectangles and press in designs using stamps or found textures.
Let dry and paint in soft hues or intricate patterns.
Use them as coasters, wall art, or even drawer labels.
They’re super customizable and great for gifting.
Incense Holders
Roll out a thick disc and gently poke a hole at an angle for stick incense.
Decorate the base with paint, pressed flowers, or stamped designs.
These are quick to make and elevate any relaxing space.
Just be sure to let them dry thoroughly before use.

Clay Bookmarks
Roll thin slabs of clay and cut into rectangles.
Stamp patterns or carve names into the surface.
Once dry, attach a tassel to the top.
These are lightweight, practical, and perfect for book lovers.
FAQ: Air Dry Clay Projects
What is the best type of clay for these projects?
Air dry clay is ideal because it doesn’t require a kiln or oven.
Choose high-quality brands that dry without cracking for best results.
How long does air dry clay take to dry?
Drying time varies by thickness, but most pieces take 24 to 72 hours.
Always let your project dry completely before sanding or painting.
Can you waterproof air dry clay items?
Air dry clay isn’t naturally waterproof, but sealing with a clear acrylic sealer or varnish adds protection.
Use water-based sealers for a smooth, non-toxic finish.
Is air dry clay safe for kids?
Yes!
It’s generally safe and non-toxic, making it a great craft for all ages.
Just supervise younger kids with sharp tools or paint.
Final Thoughts on Air Dry Clay Projects
These easy air dry clay projects are the perfect blend of creativity and relaxation.
From functional decor to personalized gifts, there’s something here for every maker.
So grab some clay and start crafting—no kiln required.
This Post Was All About Air Dry Clay Projects.